To build an outdoor volleyball court, clear and level the area, place boundary lines, install sand or grass turf, and set up a net and poles. An outdoor volleyball court provides a perfect space for fun and recreational games.
Whether you’re planning to build it in your backyard or a public park, constructing an outdoor volleyball court can be an exciting project. To begin, you’ll need to choose a suitable location and ensure the area is clear and level.
Next, mark the boundaries of the court using boundary lines. Depending on your preference, you can either use sand or grass turf for the playing surface. Finally, install a volleyball net and poles to complete the construction. With these simple steps, you can easily build your own outdoor volleyball court and enjoy countless hours of fun and fitness with family and friends.

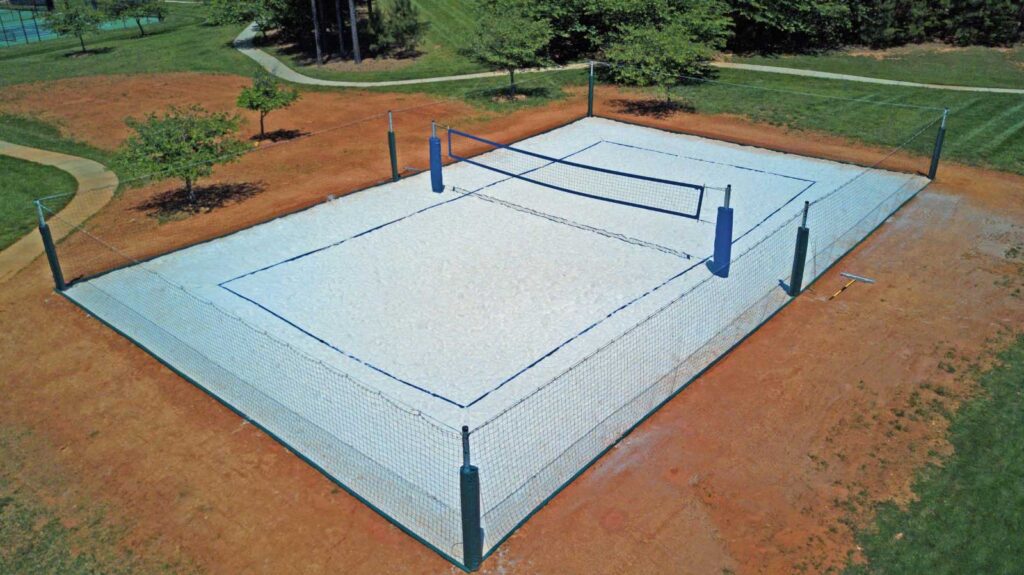
Credit: www.ncsasports.org
Planning And Preparation
If you’re an avid volleyball player, nothing beats the convenience of having your own outdoor volleyball court. Not only does it provide entertainment and a great way to stay active, but it also allows you to invite friends and family over for some friendly competition. However, building an outdoor volleyball court requires careful planning and preparation to ensure that the space is suitable and the dimensions are correct. In this section, we will discuss the key factors to consider when planning and preparing to build your very own outdoor volleyball court.
Choosing The Perfect Location For Your Court
The first step in building an outdoor volleyball court is selecting the ideal location. Look for a flat area in your yard that is away from obstructions such as trees, fences, or utility lines. The court should be free from any slopes or uneven ground to ensure a fair game. Additionally, take into consideration the amount of space you have and the distance from nearby structures or boundaries to ensure that there is adequate room for the court to fit comfortably.
Measuring The Space And Marking The Dimensions
Once you have chosen the location, it is essential to measure the space accurately before marking the dimensions. To create a regulation-size volleyball court, the dimensions should be 60 feet long and 30 feet wide. Grab a tape measure and mark the corners of the court using stakes or spray paint. Pay close attention to the angles and sides, ensuring they are properly aligned. This step will help you visualize the final court layout and ensure that it meets the necessary requirements.
Gathering The Necessary Materials And Tools
Before you can start building your outdoor volleyball court, it’s crucial to gather all the necessary materials and tools. You will need items such as wooden stakes, string or rope, measuring tape, spray paint, gravel or sand, boundary lines, volleyball net, and posts. Ensure that each item is of high quality and suitable for outdoor use to guarantee durability and longevity. Having everything prepared in advance will make the construction process smoother and more efficient.
Building your own outdoor volleyball court may seem like a daunting task, but with careful planning and preparation, it can be a rewarding project. By choosing the perfect location, measuring the space accurately, and gathering the necessary materials and tools, you will be well on your way to creating a fantastic court where you can enjoy countless hours of volleyball fun. So roll up your sleeves, get ready to construct, and let the games begin!
Clearing And Leveling The Area
Clearing and leveling the area is an essential first step in building an outdoor volleyball court. By removing any existing obstructions or vegetation and properly leveling the ground, you can ensure a firm foundation for your court and promote proper drainage. In this section, we will discuss the detailed process of clearing the area and achieving level ground, which are crucial steps towards successful outdoor volleyball court construction.
Removing Any Existing Obstructions Or Vegetation
Before you can begin leveling the area, it’s important to remove any existing obstructions or vegetation that might interfere with the construction process. Take the following steps to clear the area effectively:
- Start by inspecting the site and identifying any obstacles such as rocks, tree stumps, or large debris.
- Use suitable tools like a shovel, pickaxe, or chainsaw to remove these obstructions from the area. Ensure that you wear appropriate safety gear during this process.
- If there are any trees or shrubs that need to be removed, consider seeking professional help to ensure safety and proper removal.
- Clear any overgrown vegetation, including weeds or grass, using a lawnmower or other lawn maintenance equipment.
- Pro tip: If there is a substantial amount of existing vegetation, you may need to use herbicides or hire professionals to make the clearing process more manageable and efficient.
Leveling The Ground And Ensuring Proper Drainage
Once the area is cleared, the next step involves leveling the ground and ensuring proper drainage. Follow these essential steps for achieving a level playing surface:
- Determine the desired height and slope of your court, typically using a laser level or other accurate leveling tools.
- Rake the area thoroughly to remove any remaining debris, rocks, or uneven soil.
- If the natural soil texture is too loose or sandy, consider compacting it using a compactor machine or large roller. This will help create a stable surface for play.
- Pro tip: Adding a layer of crushed gravel or crushed limestone can further enhance stability and improve drainage capabilities.
- Using a leveling tool like a transit or a long piece of flat wood, ensure that the ground is level and free from any noticeable bumps or depressions. Make necessary adjustments by adding or removing soil as needed.
- Pay extra attention to the playing area’s corners and boundaries to ensure all sides are level and properly sloped for adequate water runoff.
By meticulously following these steps, you will have successfully cleared and leveled the area in preparation for building an outdoor volleyball court. With a firm foundation and proper drainage, you’re now ready to move on to the next steps of court construction. Stay tuned for the upcoming sections in this series, where we will guide you through the process of marking boundaries, materials selection, and court finishing touches.
Installing The Boundary Lines
Installing the Boundary Lines
One of the vital aspects of building an outdoor volleyball court is properly installing the boundary lines. The boundary lines not only define the playing area but also ensure fair play and prevent any disputes during the game. In this section, we will discuss the process of setting up the outer boundary lines and determining the proper distance for side and end lines.
Setting Up The Outer Boundary Lines
Before marking the side and end lines, it is important to set up the outer boundary lines to create a clear and organized playing area. Follow these steps to install the outer boundary lines:
- Measure the dimensions: Start by measuring the desired dimensions of your volleyball court. The standard size for a volleyball court is 18 meters long and 9 meters wide.
- Mark the corners: Use stakes or paint to mark the four corners of the court. Make sure the corners are accurately placed according to the measured dimensions.
- Set the sideline stakes: Place stakes along the sidelines, connecting each corner stake. These stakes will serve as a guide for marking the side and end lines.
- Tighten the sideline boundary rope: Attach a boundary rope to each sideline stake. Make sure the rope is tightly secured and parallel to the ground.
Determining The Proper Distance For Side And End Lines
To maintain the integrity of the game, it is crucial to determine the proper distance for the side and end lines. Here’s how you can determine the correct distances:
| Court Dimension | Side-Line Distance | End Line Distance |
|---|---|---|
| Standard (18m x 9m) | 9 meters | 3 meters |
| Modified (16m x 8m) | 8 meters | 2.5 meters |
| Small-Sided (12m x 6m) | 6 meters | 2 meters |
By adhering to these measurements, you ensure the court is set up correctly and provide players with a fair and consistent playing field based on the desired court size.
Installing the boundary lines is a fundamental step in building an outdoor volleyball court. By following the proper procedures and adhering to the standard measurements, you create a functional and enjoyable space for volleyball enthusiasts to engage in spirited matches.
Building The Foundation
When it comes to building an outdoor volleyball court, ensuring a solid foundation is crucial. The foundation sets the stage for a sturdy and long-lasting court that can withstand the rigors of intense gameplay. This section will guide you through the necessary steps to create a strong and well-drained foundation for your volleyball court.
Excavating The Area For The Playing Surface
The first step in building the foundation for your outdoor volleyball court is to excavate the area where the playing surface will be. This process involves removing any existing vegetation, rocks, or debris to create a level and clear space for your court.
Here’s a step-by-step guide to excavating the area:
- Mark the boundaries of your court using stakes and twine.
- Clear the area of any vegetation, rocks, or debris using a shovel or skid steer.
- Use a level or laser level to ensure the excavated area is even and sloping slightly away from the court’s center, promoting proper drainage.
Adding A Layer Of Gravel For Stability And Drainage
Once the area is excavated and leveled, the next step is to add a layer of gravel for stability and drainage. Gravel provides a firm base for the playing surface and helps prevent any shifting or sinking over time. Additionally, it allows water to drain away from the court, minimizing the risk of puddles and making the court usable even after rainfall.
Here’s how to add a layer of gravel:
- Spread a layer of geotextile fabric over the excavated area. This fabric will help prevent weeds from growing through the gravel and improve drainage.
- Distribute a layer of crushed limestone or gravel evenly over the fabric, typically about 4-6 inches thick. Use a rake or shovel to level the gravel and ensure an even surface.
- Compact the gravel layer using a plate compactor, making multiple passes to achieve a solid and stable base.
Once the gravel layer is properly compacted, you are ready to move on to the next steps of building your outdoor volleyball court. Stay tuned for the upcoming sections, where we will cover installing the boundary lines, choosing the right sand, and more!
Installing The Playing Surface
Installing the Playing Surface When it comes to building an outdoor volleyball court, installing the playing surface is a crucial step. This is where you lay down the foundation for a smooth, level, and high-performance playing field. In this section, we will discuss two essential aspects of installing the playing surface: laying down the weed barrier and spreading and leveling the sand or grass playing surface.
Laying Down The Weed Barrier To Prevent Unwanted Growth
Before you start laying the sand or grass, it’s important to create a barrier that prevents weed growth. Weeds can quickly take over the playing surface, making it uneven and unsafe for gameplay. To prevent this, follow these steps: 1. Select a high-quality weed barrier material: Choose a durable and permeable material to effectively prevent weed growth. Options include geotextile fabric or landscaping cloth. 2. Clear the area: Remove any existing vegetation and debris from the site. This will ensure a clean and even surface for laying down the weed barrier. 3. Measure and cut the weed barrier: Measure the dimensions of the playing area and cut the weed barrier material accordingly. Leave a few inches of extra material on each side to overlap with the edges. This will prevent any potential gaps that weeds could exploit. 4. Secure the weed barrier: Lay the cut pieces of the weed barrier over the playing area, ensuring they overlap by a few inches. Use landscaping staples or other suitable fasteners to secure the material in place. Make sure it is taut and free from wrinkles. 5. Inspect and trim: Walk over the entire surface to check for any wrinkles or loose edges. Trim any excess material to create a clean finish.
Spreading And Leveling The Sand Or Grass Playing Surface
Once the weed barrier is in place, it’s time to spread and level the playing surface. This step ensures that the court is even, and safe, and provides optimal playing conditions. Follow these guidelines: 1. Choose the appropriate playing surface: Depending on your preferences and budget, you can choose between sand or grass as the playing surface. Sand is the most common choice for outdoor volleyball courts due to its even texture and excellent shock absorption. If you choose a grass surface, make sure to select a type that can withstand heavy foot traffic and offers good ball bounce. 2. Prepare the playing area: Remove any debris, rocks, or uneven patches from the surface. Use a rake or shovel to level the area, making it as even as possible. 3. Spread the sand or grass: If using sand, pour it evenly over the weed barrier, ensuring a thickness of approximately 8-12 inches. Use a long board or leveler to distribute the sand uniformly. If opting for a grass surface, sow the grass seed or roll out the turf, making sure to overlap the edges and seams. 4. Level the playing surface: Use a large straight board or a lawn roller to level the sand or grass surface. Gradually move back and forth across the entire court, applying even pressure to ensure a smooth play area. Check the level frequently to ensure an even surface. 5. Inspect and maintain: Walk around the court, looking for any uneven spots or areas that need additional attention. Fill in any low spots with extra sand or add more grass seed if necessary. Regularly maintain the court by raking the sand or mowing the grass to keep it in optimal condition. By following these steps, you can install a high-quality playing surface for your outdoor volleyball court. Remember to consider the specific requirements of your court, budget, and maintenance capabilities when choosing between sand and grass. End of content
Frequently Asked Questions Of How To Build An Outdoor Volleyball Court?
What Are The Dimensions Of An Official Outdoor Volleyball Court?
An official outdoor volleyball court measures 59 feet long and 29. 5 feet wide.
How Much Sand Do You Need To Make A Volleyball Court?
To make a volleyball court, you’ll need about 50 tons of sand, covering an area of 60 feet by 30 feet.
How Many Tons Of Sand Do You Need For A Beach Volleyball Court?
Approximately 100 tons of sand is needed for a beach volleyball court.
How Much Space Is Needed Around A Volleyball Court?
The volleyball court requires ample space around it. The recommended minimum clearance is at least 9. 1 meters or 30 feet on all sides.
How Much Space Is Needed For An Outdoor Volleyball Court?
An outdoor volleyball court typically requires a space of 60 by 30 feet, including clearance on all sides.
What Materials Are Required To Build An Outdoor Volleyball Court?
To build an outdoor volleyball court, you will need materials such as sand, boundary lines, net, poles, and anchors.
Conclusion
Building an outdoor volleyball court requires careful planning and attention to detail. From selecting the right location to ensuring proper drainage and maintenance, each step is crucial to creating a safe and enjoyable playing area. By following the guidelines provided in this blog post, you can create a volleyball court that will enhance your outdoor space and provide hours of fun for players of all ages.
So, roll up your sleeves and get ready to build your very own outdoor volleyball court!
You may also like to read this – How to Become a Certified Volleyball Coach