
To hem ski pants, you will need measuring tape, pins, scissors, and a sewing machine. First, measure the desired length of the pant leg and fold the excess fabric to create a hem.
Use pins to secure the folded fabric in place, then trim the excess material. Finally, use a sewing machine to stitch a straight line along the folded edge of the pant leg.
Credit: www.treelinereview.com
Preparing Your Pants For Hemming
Preparing your pants for hemming is an essential step to achieve a perfect fit and a polished look. Whether you’ve recently purchased a new pair of ski pants or want to alter an existing pair for a better length, the process remains the same. In this section, we will guide you through the necessary steps to prepare your pants for hemming, ensuring a professional and tailored finish that suits your individual style and preference.
Measuring The Desired Length
The first step in preparing your ski pants for hemming is to determine the desired length. This ensures that the pants are neither too long nor too short, making them comfortable and functional for skiing activities. To measure the appropriate length, follow these simple steps:
- Put on the pants and fasten any closures. Make sure to wear the shoes or boots you typically wear while skiing to get an accurate measurement.
- Stand up straight with a relaxed posture, and ask someone to help you with the measurements.
- Measure the length from the waistband to the desired hemline. Take note of the measurement in inches or centimeters.
Marking The Hemline
Once you have determined the desired length, it’s time to mark the hemline on your ski pants. This ensures that you cut the fabric accurately and achieve a consistent length on both pant legs. To mark the hemline, follow these steps:
- Turn the pants inside out.
- Using a ruler or measuring tape, start from the bottom of the pant leg and measure the desired length.
- Place a small pin or use a fabric marker to mark the measurement at various points around the leg. This will serve as a guide when cutting the fabric.
- Continue marking the hemline on the second pant leg using the same measurements.
Preparing The Fabric For Cutting
Before you start cutting the fabric, it’s essential to prepare it adequately to prevent fraying and ensure a clean edge. Follow these steps to prepare the fabric:
- Trim any loose threads or excess fabric near the bottom of the pant leg.
- Fold the fabric inside, aligning it with the marked hemline. Use an iron to press it firmly and create a crease.
- Secure the folded fabric with sewing pins, placing them at regular intervals along the hemline. This will keep the folded fabric in place while you cut.
By adhering to these steps, you’ll be well-prepared to start hemming your ski pants with precision and confidence. In the next section, we will delve into the actual process of hemming, guiding you through each step to achieve a professional finish that will enhance your skiing experience.
Choosing The Right Tools And Materials
When it comes to hemming your ski pants, having the right tools and materials is essential. Whether you choose to use a sewing machine or hand sewing techniques, it’s important to have the appropriate thread and needle, fabric scissors, measuring tape or ruler, and pins or clips on hand. In this section, we will explore each of these elements in more detail.
Sewing Machine Or Hand Sewing
If you have access to a sewing machine, hemming ski pants can be a breeze. A machine allows for quick and precise stitching, making the process much faster. However, if you don’t have a sewing machine or prefer hand sewing, don’t worry! Hand sewing can be just as effective, albeit a bit more time-consuming. It also gives you greater control over the stitching and allows you to make more intricate adjustments.
Appropriate Thread And Needle
Choosing the right thread and needle is crucial for a strong and durable hem. For ski pants, it is recommended to use a polyester or nylon thread that can withstand the wear and tear of outdoor activities. These threads are known for their strength and resistance to abrasion. Ensure that the thread color matches the fabric to create a seamless look.
As for the needle, a universal needle with a medium size (80/12 or 90/14) is typically suitable for most ski pants fabrics. However, if you’re working with thicker or more technical materials, you may need to use a specialized needle designed for heavy-duty sewing. Remember to change the needle regularly to maintain its effectiveness.
Fabric Scissors
When it comes to cutting the excess fabric for hemming, having a pair of fabric scissors is essential. Fabric scissors are designed to make clean and precise cuts, which is crucial for achieving a professional-looking hem. Avoid using regular scissors as they may cause fraying or uneven edges. Keep your fabric scissors sharp and dedicated solely to fabric cutting to ensure their effectiveness.
Measuring Tape Or Ruler
Accurate measurements are key to a well-executed hem. Whether you prefer using a measuring tape or ruler, having a reliable measuring tool is essential. Start by measuring the desired length of your ski pants, keeping in mind the type of footwear you’ll be wearing with them. Double-check your measurements to avoid any mishaps before cutting and sewing the hem.
Pins Or Clips
Using pins or clips helps hold the fabric in place while you sew, allowing for easier and more precise stitching. When pinning or clipping your hem, ensure that the fabric is taut but not overly stretched. This will help you achieve consistent and even results. If using pins, place them perpendicular to the hemline, making it easier to remove them as you sew. If using clips, opt for ones with a good grip and that won’t damage the fabric.
Hemming Techniques For Ski Pants
Ski pants are an essential piece of gear for any winter sports enthusiast. They provide protection from the cold, wind, and wet conditions, ensuring that you can stay comfortable on the slopes. However, finding ski pants that fit perfectly can be a challenge. That’s where hemming techniques come in. Whether your ski pants are too long or need a bit of adjusting, you don’t have to worry. In this blog post, we will explore three effective hemming techniques for ski pants: the traditional method, the blind hemming technique, and using a serger for a professional finish. So, let’s dive right in and learn how to hem ski pants!
Traditional Hemming Method
When it comes to hemming ski pants, the traditional method is the most commonly used technique. It’s a simple and effective way to shorten the length of your ski pants without compromising the overall look. To use this method, follow these steps:
- Put on your ski pants and fold the bottom hem to the desired length. Make sure the pants are the proper length when wearing ski boots.
- Using pins, secure the folded part of the hem in place. Make sure the pins are placed evenly and perpendicular to the pant leg.
- Take off the ski pants and turn them inside out.
- Using a needle and thread that matches the color of the pants, sew a straight stitch along the folded edge, removing the pins as you go.
- Trim any excess fabric, leaving a small seam allowance.
- Finally, iron the hem to flatten and smooth out any wrinkles.
Blind Hemming Technique
If you want a more discreet hem, the blind hemming technique is a great option. This method creates an almost invisible hem, perfect for ski pants with intricate patterns or fabrics that are difficult to sew. To blind hem your ski pants, follow these steps:
- Put on your ski pants and fold the bottom hem to the desired length, just like in the traditional method.
- Using pins, secure the folded part of the hem in place.
- Turn the pants inside out and fold back a small section of the pant leg near the hemline, exposing the wrong side of the fabric.
- Create a blind hem stitch by folding the raw edge of the fabric under and sewing a straight stitch, catching only a few threads from the folded part of the hem with each stitch.
- Continue sewing the blind hem stitch along the entire length of the pants.
- Trim any excess fabric and press the hem to give it a crisp finish.
Using A Serger For A Professional Finish
If you want to take your ski pants hem to the next level, using a serger is the way to go. A serger creates a professional finish by trimming the fabric edges and sewing them neatly. To hem your ski pants using a serger, follow these steps:
- Put on your ski pants and fold the bottom hem to the desired length, just like in the traditional method.
- Using pins, secure the folded part of the hem in place.
- Turn the pants inside out and use a serger to trim the raw edge of the fabric while simultaneously sewing a clean and secure stitch along the folded edge.
- Make sure to guide the fabric through the serger evenly to create a consistent and professional-looking hem.
- After serging the hem, trim any excess fabric and press it to give the hem a polished finish.
With these three hemming techniques in your arsenal, you can easily adjust the length of your ski pants to perfection. Whether you choose the traditional method, blind hemming technique, or using a serger for a professional finish, you’ll be able to hit the slopes in style and comfort. So, grab your sewing kit and get ready to transform your ski pants into the perfect fit!
Sewing Tips For Hemming Ski Pants
When it comes to hemming ski pants, it’s important to have the right sewing tips to achieve a professional-looking finish. Proper hemming not only ensures that your pants fit you perfectly but also helps to prevent any drag or tripping hazards on the slopes. In this blog post, we’ll discuss three essential sewing tips that will guide you through the process of hemming ski pants. From adjusting the tension on the sewing machine to using a walking foot for even stitches and backstitching to secure the hem, we’ve got you covered. Read on to learn more!
One of the key factors in achieving a successful hem is properly adjusting the tension on your sewing machine. Incorrect tension can result in loose or puckered stitches, which can compromise the overall quality of your hem. To ensure a clean and professional finish, follow these steps:
- Begin by referring to the instruction manual of your sewing machine to locate the tension adjustment dial or knob.
- Start with the thread tension set at the default “4” position and test it on a scrap piece of fabric.
- If the stitches appear too loose or too tight, make small adjustments by turning the tension dial or knob slightly in either direction, until you achieve even and balanced stitches.
- Remember to always test the tension on scrap fabric before sewing on your ski pants to avoid any damaging mistakes.
When it comes to sewing bulky fabrics like ski pants, using a walking foot can make a significant difference in achieving even stitches. A walking foot works by feeding the fabric layers evenly through the machine, preventing any shifting or stretching during the sewing process. Here are the steps to use a walking foot:
- Attach the walking foot to your sewing machine according to the manufacturer’s instructions.
- Place your ski pants under the foot, ensuring that all layers of the fabric are smooth and aligned.
- Start sewing at a slow and steady pace, allowing the walking foot to guide the fabric through the machine.
- Continue sewing, making sure to keep the fabric aligned and the stitches even throughout the hem.
To ensure that your hem stays secure and doesn’t unravel, it’s important to backstitch at the beginning and end of the hem. Backstitching involves sewing a few stitches forward, then reversing the stitch direction before continuing forward again. Follow these steps to backstitch:
- Position your ski pants under the needle, ensuring that the needle is at the starting point of the hem.
- Lower the needle into the fabric and lower the pressure foot.
- Start sewing forward for a few stitches, then press the reverse button on your sewing machine to sew backward over the same stitches.
- After backstitching, release the reverse button and continue sewing forward along the hemline until you reach the end.
By backstitching at the beginning and end of the hem, you’ll create a secure lockstitch that will prevent any unraveling and reinforce the strength of your hem.
Troubleshooting Common Issues
Looking to hem your ski pants? Troubleshoot common issues with this easy step-by-step guide. Get the perfect fit and hit the slopes in no time!
Dealing With Bulky Or Thick Fabric
Hemming ski pants can be a bit challenging, especially when dealing with bulky or thick fabric. However, with the right techniques, you can achieve a neat and professional-looking hem. Here are some troubleshooting tips to help you work with these types of fabrics:
- Use a heavy-duty sewing machine needle: When sewing through bulky or thick fabric, using a regular needle may cause it to break or bend. Switch to a heavy-duty needle, such as a size 90/14 or 100/16, to ensure it can handle the fabric’s thickness.
- Consider using a walking foot: A walking foot is a specialized sewing machine foot that helps feed multiple layers of fabric evenly. It can be particularly useful when dealing with thick or bulky fabric, preventing the layers from shifting or bunching up.
- Trim excess fabric: Before hemming, trim any excess fabric from the edges. This can help reduce bulk, making it easier to fold and sew the hem.
- Use longer stitch lengths: When sewing through thick fabric, using longer stitch lengths can help prevent skipped stitches or thread breakage. Experiment with different stitch lengths to find the one that works best for your fabric.
Fixing Uneven Hems
An uneven hem can throw off the overall look of your ski pants. Luckily, there are simple ways to fix this issue and ensure a balanced and straight hemline. Here’s how:
- Measure and mark: Start by determining the desired length of your ski pants. Use a measuring tape to measure the distance from the original hem to the desired length. Mark this measurement with pins or tailor’s chalk on both pant legs.
- Level the pants: Lay your ski pants on a flat surface, ensuring they are evenly aligned. Smooth out any wrinkles or folds to ensure an accurate measurement.
- Check and adjust: Double-check the marked measurements to ensure they are even on both pant legs. If there are any discrepancies, make adjustments accordingly.
- Trim excess fabric: If your ski pants have a significant amount of excess fabric, consider trimming it before hemming. This can help reduce bulk and make it easier to achieve a straight and even hemline.
- Sew the new hem: Fold the fabric along the marked line, creating the new hem. Pin it in place, and using a sewing machine or needle and thread, stitch along the fold to secure the hem. Remove the pins as you sew.
Reversing A Hem If Needed
Sometimes, despite careful measurements, you may find that you need to reverse a hem on your ski pants. Whether you need a bit more length or want to adjust the fit, it’s possible to undo a hem and make the necessary changes. Here’s how:
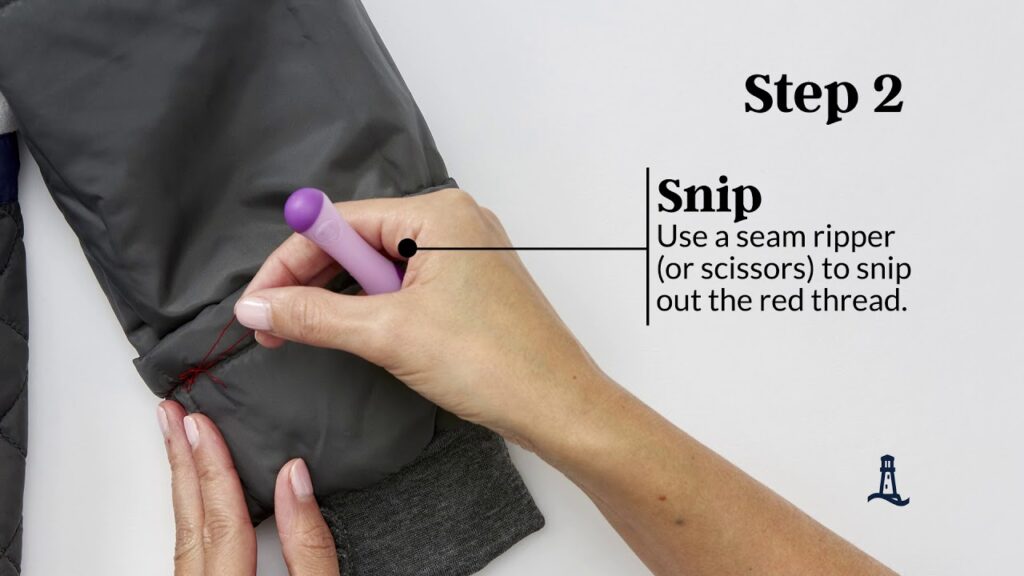
- Rip out the original hem: Carefully use a seam ripper or small scissors to remove the stitches of the original hem. Take your time to avoid damaging the fabric.
- Press the fabric: After removing the original hem, press the fabric to remove any creases or imprints left behind. This will ensure a clean surface for re-hemming.
- Make the desired adjustments: If you need to add length, measure and mark the additional distance from the original hemline. If you want to adjust the fit, consider tapering the leg or making necessary alterations.
- Secure the new hem: Fold the fabric according to your measurements and desired adjustments. Pin it in place and sew the hem using a sewing machine or hand stitching. Be sure to remove the pins as you sew.
Frequently Asked Questions Of How To Hem Ski Pants?
How Do You Measure Ski Pants For Hemming?
To measure ski pants for hemming, put them on with ski boots and have someone help mark where the pants touch the ground at the back.
Can You Hem Ski Pants Without A Sewing Machine?
Yes, it is possible to hem ski pants without a sewing machine. You can use hand stitching or fabric glue for a temporary fix.
What Is The Ideal Length For Hemming Ski Pants?
The ideal length for hemming ski pants is to have them just touching the top of your ski boots when you are in a skiing position.
What Type Of Thread Is Best For Hemming Ski Pants?
For hemming ski pants, it is recommended to use a strong, durable thread like polyester or nylon that can withstand the demands of skiing.
Can I Hem Ski Pants With A Straight Stitch?
While it is possible to hem ski pants with a straight stitch, using a stretch stitch or a zigzag stitch is recommended to maintain the flexibility of the pants.
Conclusion
To sum up, hemming ski pants is a straightforward process that can be done at home with just a few simple steps. By following the techniques outlined in this blog post, you can ensure a proper fit and length for your ski pants, enhancing both comfort and performance on the slopes.
Remember to take accurate measurements, choose the right sewing technique, and use durable materials for a long-lasting hem. Now you’re ready to hit the slopes in style!
You may also like to read this – How to Efficiently Pack 2 Skis in a Ski Bag?